1.4 Query and search - LUPMISManual
Main menu:
1.4 Query and Search
Level of expertise required for this Chapter: Intermediate; general Map Maker training
Often you are more interested in the data behind a feature, for example the quantitative data of a table describing each unit of a map (census data of an administrative map). This functions only if you have attribute data attached to your graphical data. See Chapter 4 for details.
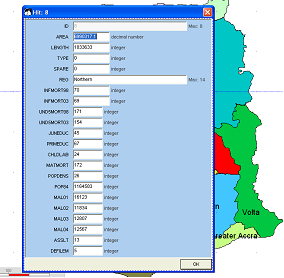
Click on Data-tool of the toolbar left, and then on any feature, you are interested in (and which is ‘hit-able’).

You will see the display of many characteristics:
- - - - -
How to find data?
There are various tools in Map Maker to search for a specific feature:
A) Using the Gazetteer:
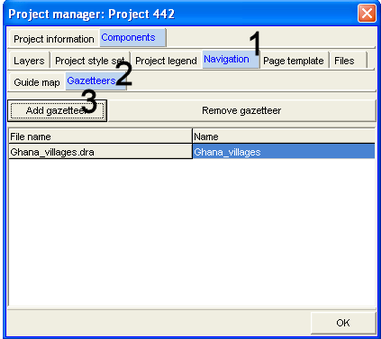
1. You define the gazetteer with right-mouse > Project manager > Navigation > Gazetteers > Add gazetteer > Select folder and file > Open > OK
You can have multiple gazetteers from different files, but it is always the display label, which is gazetteered.
2. You search through Main menu > Navigate > by Gazetteer > Navigation window: Gazetteer (1, see below) > If you have multiple gazetteers, select > Select the unit you search for (2) > OK (3)
If the listing is very long, you can use the Find tool: In the Navigation window under Find, enter the name of search. Wild card * can be applied, for example:
Bak will find all entries starting with Bak: Bakanta, Bakrom, Bakua, Bakunchirako.
*Bak* will find all entries, which contain ‘bak’.

- - - - -
B) Go to object id:
If you know the object id and search for, the fastest way is through Main menu > Navigate > Go to Object ID > Go to Object ID window: Enter id > OK
- - - - -
C) As file operation:
Main menu > Utilities > Vector utilities > Actions > Select folder and file > Open > Transform window: Spatial queries > Find objects > OK > Search by criteria window: Select from the long listing under ‘Terms’ right: Double-click (1, see below) > Enter criteria statement left (2) > You can define more than one criteria, also include additional file(s) in your search (Add file) > OK (3)
Search will then start. If nothing found, a Failed find window will appear.
> Specify new file name > Save. You can then add (display) this new layer, which contains only the items found under this search.
- - - - -
D) In live layer mode:
The map has first to be transferred to live layer (right-mouse > Project manager > select (or add) layer > Copy layer to live layer > OK).
In live layer: Main menu > Edit > Show selection manager > Selection Manager window: Find tab > Select the criteria from the list, for example ‘Find objects by criteria’ > Find > Search by criteria window: Select from the long listing under ‘Terms’ right > Enter criteria statement left > You can define more than one criteria, also include additional file(s) in your search (Add file) > OK. (This is the same process as described above under B).

Search will then start. If nothing found, a Failed find window will appear. Otherwise, the selected unit(s) will show in red.
From here, you can edit or delete this feature.
- - - - -
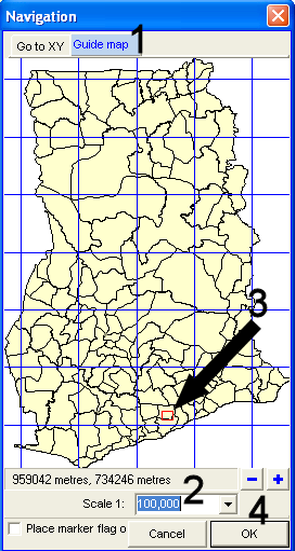
E) Using the Guide map feature:
If you know roughly the area, an easy way to ‘navigate’ to this area is Main menu > Navigate > by Guide Map > Navigation window: Select scale (or zoom in or out with + or -) > Click on the area of interest > OK
- - - - -
F) By coordinates:
If you know the coordinates, you can navigate to that location by Main menu > Navigate > Go to coordinate > Navigate window: Go to XY > Enter x and y coordinates > OK
- - - - -
G) Street names or housenumbers:
The processes for searching a street name or housenumber are explained in Chapter xxxxxxxxxxx, based on geocoding database and standardized street naming.
- - - - -
LUPMIS exercise: Add layer Ghana_regions_popdata, link it with the database of the same name, and display socio-economic data of each region.