5.3.6 Shift raster map - LUPMISManual
Main menu:
5.3.6 Shift Raster Map
Level of expertise required for this Chapter: Intermediate; general Map Maker training
A) You can move a raster map a short distance by:
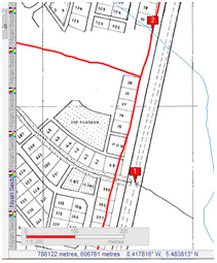
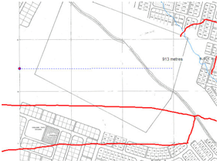
1.You calculate, which distance the map has to be moved horizontally (in W or E direction) and/or vertically (in N or S direction). It is recommended, to have a display with the raster map and geographically correct (if possible, GPS-tracked) line data. The example right shows a raster sector layout map, and the tracked lines of red roads and blue rivers.
- 1.1 Mark a clear point in both maps (in the example below with makers). To set a marker, press M.
- 1.2 Read the coordinates from the bottom left of the screen.
- 1.3 Calculate the differences both in horizontal and vertical directions.
- - - - -
| Meter, positiv |
Meter, negative |
||
Horizontal |
W-E direction |
-> E |
-> W |
Vertical |
N-S direction |
-> N |
-> S |
2. In Map Maker: Main menu > Edit > Live layer rubber sheet > Show bitmap rubber sheet > Choose file window: Select the file type (preferably, you work with TIF files) > Select folder and file of the original raster file > Open > If a display appears: This bitmap is calibrated. Do you want to initialize the image to this calibration?: Yes >
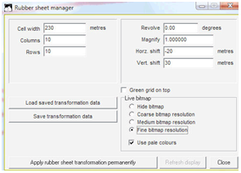
> Rubber sheet manager window: Enter the shift values in horizontal and vertical directions ( in meters, as explained above) > Select ‘Fine bitmap resolution’ > Apply rubber sheet transformation permanently > Preferably, select same file type as source file type (e.g. TIF) > Define new file name (recommended: previous file name, with _shft added to the file name, before the dot and the extension) > Save >
Rubber sheet window:
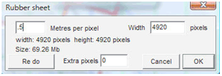
Reduce the meters per pixel to:
0.5 at sector layouts, orthophotomaps, satellite images
5 at topographic maps of 1:50,000
different value at other maps
> OK >
> Rubber sheet window: The processing and display of the map might take some time. Be patient! > OK > Select calibration options window: Map Maker Calibration > OK > Be patient again!
Finished! You can now load the processed image.
- - - - -
B) You can also rotate an image:
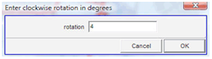
First, estimate how much (how many degrees) you want the image to be rotated. This is often trial-and-error.
In Map Maker: Main menu > Utilities > Bitmap utilities > Revolve > Choose file window: Select the file type (preferably, you work with TIF files), folder, file name of the original raster file > Open > Transform file window > Write to a new file > Preferably, select same file type as source file type (e.g. TIF) > Define new file name (recommended: previous file name, with _rot added to the file name, before the dot and the extension) > Save > OK >
Enter clockwise rotation in degrees windows: Enter angle in degrees clockwise > OK
Finished! You can now load the processed image.
In both cases above (1: moving and 2: rotating) the scale will not be changed. If you have maps (e.g. sector layouts) with a grid, it is recommended to check the distance between the grid lines. In the example below, 3 grid lines on the 1:2,500 sector layout indicate 3 x 1000 feet = 914.40 m. Check with the Tape-tool from the toolbar left.
- - - - -
C) If you know the distance to move at the four corners, you can also use the 'Stretch by the four corners' options, which requires some preparation:
1. Calculate for each corner the shifting distance in x and y direction (can be + or - or 0).
2. Prepare an external worldfile (see also Annex 2.3): Main menu > Utilities > Bitmap utilities > Convert file format > From JPG > Select folder and file to be stretched > Open > Save as window > Specify new file name (e.g. Temp), as default BMP > Save > Select calibration options window: World file (bpw) > OK
3. Stretch the image: Main menu > Utilities > Bitmap utilities > Stretch by the four corners > Select the folder and file, as prepared in the previous step (e.g. Temp.bmp) > Open > (it might take a minute to load) > Four corner stretch window: Enter the shifting distance at the corner (1, see below, example of +500 m in x direction of top left corner) > Apply stretch (2) > (During process, image will be shown, 3) > Save as window: Select same file (!) as source file (here: Temp.bmp) > Save > Close (4)
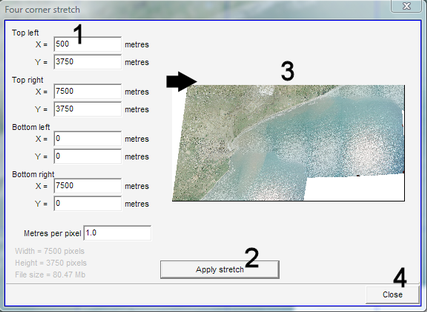
4. Bring it back to Map Maker calibration format. Main menu > Utilities > Bitmap utilities > Convert file format > From BMP > Select file of previous step (here: Temp.bmp) > Open > Save as window > File format: JPG > Specify the very original file name > Save > Select calibration options window: Map Maker calibration > OK
Finished.