5.2.1 Import vector map from external source - LUPMISManual
Main menu:
5.2 Vector Maps
5.2.1 Import Vector Map from External Sources
Level of expertise required for this Chapter: Intermediate; general Map Maker training
General process: --> DRA --> UTM --> merging
After having received data files from another agency or institution, you have to check for their format, projection and units.
A) Format
Are the data in SHP or DRA or E00 format or other?
In most cases you can identify this by the extension of the file(s).
If it is a SHP file, convert it to DRA format: Main menu > Vector utilities > Import files > ArcView Shape file > Import … window: Import file > Choose source SHP file > Select … > Open > Next step > Use serial number as object ID, and Import database > Select relevant fields > Next step > Choose target file > Select … > Finish > Confirm save
- - - - -
Note 1: If it is an E00 file, follow procedure explained in Annex 14.2 and Chapter 5.4.2.
Note 2: If it is a KML (point) file, use the utility GPSUtility and follow procedure explained in Chapter 5.1.8 to convert it to a SHP file, and form it to a line (if necessary). Once you have it in a SHP file, convert it to a DRA file (as explained above). (See also Chapter 2.2 for conversion of KML files and Annex 7 for GPSUtility).
- - - - -
B) Projection
Are the data un-projected (lat/long) or in UTM projection or War Office or other?
Load the DRA file into Map Maker and read the coordinates at the bottom left corner:
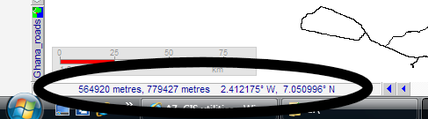
If there are two figures in meters and two in degrees, with an N value (Northing) of between 7 and 10 degrees (as shown above), it is most likely projected in UTM 30: Ok.
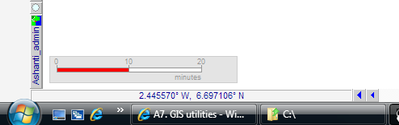
If there are only two figures (W or E, and N), with N between 7 and 10, it is most likely un-projected, i.e. in latitude / longitude (see below). It then has to be converted to UTM (see Chapter 5.2.4 ).
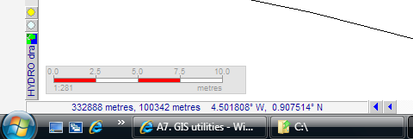
If there are two figures in meters and two in degrees, but the Northing value is less than 5 (like 0.9075 in the sample below), the projection is most likely in War Office (Ghana Grid), either in metes or in feet. The map has to be converted to UTM (see Chapters 5.2.2 and 5.2.3).
Main menu > Utilities > Latitude and Longitude utilities > XY file to another projection > Vector > Choose source map projection window: Ghana Grid (if not available, define it, as explained at Annex 1.1.7) > OK > Select SHP as file type (no other import format possible) > Select folder and file > Choose target map projection window: UTM 30 > Select DRA as file type > Specify new file name > Save > OK
- - - - -
C) Units
Is the map in meters or feet or degrees?
If the projection is War Office / Ghana Grid, you have to check, if the units are in meters or feet. If in feet, it must be also converted to meters (see Chapter 5.2.2).
- - - - -
Data are often fragmented into small tiles (e.g. 2 x 1 km). Thus, they have to be ‘merged’ (combined).
For vector maps, you can copy layer by layer to the live layer (Project manager window: Copy layer to live layer), and save all of them together from there into new one layer.
- - - - -
Some of them have an attribute data table attached. Follow process below.
1. Renumber labels and Ids:
Right-mouse > Project manager > Add layer > Select folder and DRA file > Open > Back to Project manager window: Data link > Choose database > Select folder and DBF file > The ‘link column’ should be the ID, highlighted > Copy layer to live layer > OK
Right-mouse > Live layer actions > Ids and labels > Amend labels and Ids > OK > Amend labels and Ids window: Renumber Ids starting from: Give a new unique number, in thousands (e.g. 1000 for the 1 tile, 2000 for the 2 tile etc) > OK
Main menu > Edit > Save live layer > Leave folder unchanged > Select DRA type > Leave file name unchanged > Save > Overwrite: Yes > Leave folder unchanged > Leave file name unchanged > Save > Overwrite: Yes
Main menu > File > Clear
Repeat this process for all files (tiles) to be merged
2. Merge: Right-mouse > Project manager > Add layer > Select folder and (DRA) file > Open
Repeat for all files to be merged
Still in Project manager window: Copy layer to live layer, for all files to be merged > OK
Main menu > Edit > Live layer data > Merge data table with live data > Choose file window: Select folder and file > Choose link column window: Select ID, leave both boxes ticked, and OK > Pick columns to import window: Tick field(s) of importance > OK, and repeat for all files to be merged (as previously selected)
Check by: Main menu > Edit > Live layer data > Edit data and scroll through all records, observe the column ID.
Main menu > Edit > Save live layer > Leave type (DRA) unchanged > Select folder > Specify file name > Save > Leave type (DBF), folder and file name unchanged > Save
3. Link converted file to DBF file: Load > Copy layer to live layer > OK > Main menu: Edit > Live layer data > Merge data table with live data > Select folder and file > OK > Choose link column window: ID > OK > Pick columns to import window: ID and relevant fields > OK > Main menu: Edit > Save live layer > Select folder and file name > OK