A17.2 Exercise 2 - LUPMISManual
Main menu:
A17.2 Exercise 2
One layer: How can the scale and georeference of a layer be changed?
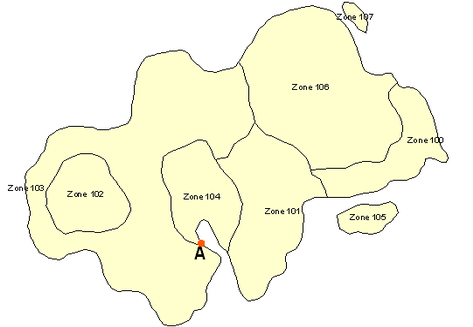
Step 1. First load your file (here “exercise2.dra”) identify a point on the map for which you know the true co-ordinates – point A in this example. Be sure to choose a point which you can identify precisely on the map such as a point where lines intersect.
Place the cursor over point A and read off from the bottom left of the screen the co-ordinates of the point. Suppose they are: 545, 127. (i.e. X = 545, Y = 127)
But we know that in reality the co-ordinates of point A are: 445160, 728124
This means that in order to move the map so that point A is in its correct position we must shift the layer 445160 – 545 metres to the right, and 728124 – 127 metres upwards (i.e. 444615 right and 727997 up).
In Map Maker go to Utilities > Vector utilities > Actions. Choose your DRA file, click OK. In the Actions dialogue box choose Transformations > Shift co-ordinates of vectors.
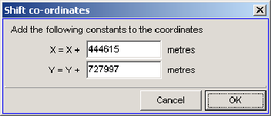
In the Shift co-ordinates dialogue box enter the amounts that you need to shift the file. Note that if you needed to shift left or downwards the values you would enter would be negative. Click OK. You are now prompted to enter the name for a new DRA file – this means your original file is left untouched. In this example we call the new file Temp.dra.
Point A should now be in the correct place. To check that you have done it correctly clear the screen and load the new file – temp.dra – and place the cursor over point A and check that the co-ordinate displayed in the bottom left is now the true co-ordinate.
Step 2. Unless your layer was already the correct scale you now need to alter the scale. To do this you either need to know the distance to another known point (point B) or know its co-ordinates.
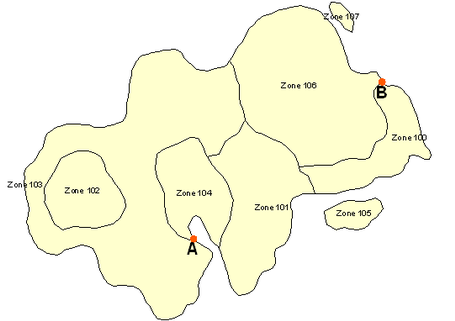
To maximise accuracy point B should be as far away from point A as possible. Suppose that the co-ordinates of point B are: X = 449872, Y = 730677
Select the Tape-measure-tool from the toolbar left. Click on point A and move the cursor to point B and read off the distance – in this instance suppose it reads 1298 metres. Remember this is the uncorrected distance not the true distance.
If you have a paper original to work from with a known scale you could determine the true distance AB by measuring the distance on the map and applying the known scale. If you do not, but you do have the co-ordinates of A and B then you can determine the distance by calculation.
The distance between A and B is the square root of (B – A)sqr + (B – A)sqr
In this case: sqr root ( (449872 – 445160)sqr + (730677 – 728124)sqr )
equals… sqr root (4712sqr + 2553sqr)
which equals… sqr root (22202944 + 6517809)
which equals… 5359.17
So, in this example the true distance AB is 5319.17 metres but the current distance as measured on screen is 1298 metres. This means you need to magnify the co-ordinates by a factor of 5319.17 divided by 1298, i.e. 4.09797.
Click on Utilities > Vector utilities > Actions. Select your new file Temp.dra. In the Actions dialogue box select Transformations > Multiply co-ordinates of vectors.
Point A is already in its correct location so you want to multiply the co-ordinates of other points relative to point A while keeping point A fixed. In the Stretch dimensions dialogue box enter the co-ordinates of point A:
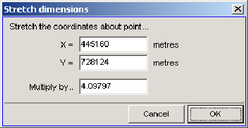
And then enter the multiplication factor that you just calculated. Click OK. Again you are prompted to name a new DRA file. Here we have called it temp1.dra.
Step 3. If your original DRA file was orientated with north upwards then your new file, temp1.dra, should now be correct. However, if it was not, or if you are not certain that it was, then a third step is required to rotate the DRA file around point A.
Clear the screen and load the new file, temp1.dra. Place your cursor over point B. If the orientation of north was correct in the original file then the co-ordinates in the bottom left of the screen should now be the correct true co-ordinates of point B. If they are not, then move the cursor until the co-ordinates given in the bottom left are the true co-ordinates of point B. Press the “M” key on the keyboard and a temporary marker will be placed on that spot.
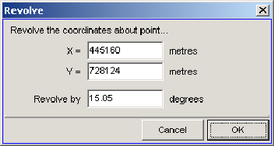
Go to Tools > Measurement > Angle measurer. Click on Point A. As you now move the cursor about the screen the compass bearing of the line from point A to the cursor is displayed. Place the cursor over point B and note down the bearing. In our example the bearing from A to B is 65.66 degrees. Then move the cursor to the marker and note down the bearing, in our example 80.71 degrees. This means we want to rotate the file by 80.71 - 65.66 degrees; i.e. 15.05 degrees. (Note to clear the angle measurement click again).
Go to Utilities > Vector utilities > Actions. Select your file, temp1.dra. In the Actions dialogue box select Transformations > Rotate co-ordinates of vectors. In the Revolve dialogue box enter the co-ordinates of point A and the clockwise rotation that you want to apply:
Click OK. Again you are prompted to name a new DRA file. This will be your final corrected file.