A16.7 Distance & Bearing - LUPMISManual
Main menu:
A16.7 Distance & Bearing
Level of expertise required for this Chapter: Intermediate; general Map Maker training
Distance & bearings used to be field parameters in conventional surveys – before the introduction of GPS and other modern technologies. At Map Maker, there are different possibilities to automatically calculate distance & bearings for a polygon (for example, parcel) or line.
Once you a polygon (parcel) in LUPMIS, you can display the coordinates on a map (for example, parcel plan) either on all ‘legs’ of the parcel on the map (method A below) or in a matrix table (method B below).
As preparation, you have to separate the parcel and save it in a temporary file:
- Either: If you only know the location: Copy to the parcel map to the live layer > Select (at left toolbar) > Select the parcel > Select the parcel > Main menu > Edit > Save selection > Select folder > Specify name for temporary file > Save > Main menu > Clear live layer > Main menu > Clear >
- Or: If you know the UPN (or other criteria): Main menu > Utilities > Vector utilities > Actions > Select folder and file of parcel map > Open > Transform window: Spatial queries > Find objects > OK > Search by criteria window: Select terms: ID (if searching for UPN) > Criteria statement: Enter UPN > OK > Specify name for temporary file > Save
Note 1: If the parcel has a ‘round’ boundary, you should delete some of the vertex points in live layer. Delete them. Otherwise, you have too many points defining the parcel.
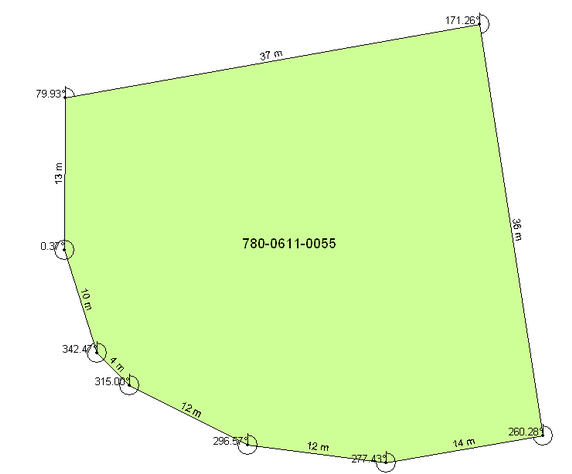
A) Display of distance & bearings on each survey leg:
A.1 Copy the temporary file with the parcel into the live layer, then Edit (from the toolbar left) > Click on parcel > Actions > Convert line to ‘chain dimension line’ > OK
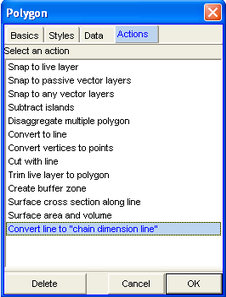
Note 2: Requires Map Maker May 09 version or later.
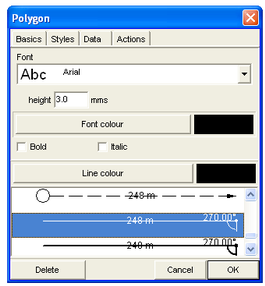
> Polygon (or Line) window: Select the option with distance and bearing at the bottom of the list > OK >
Save this file.
Note 3: This is not a (poly)line, but a ‘chain’. It can not be selected.
Note 4: You can also draw a line, or ‘chain’ of lines, through right-mouse > Drawing > Dimensions > Chain > Start point > (Vertex points) > End point > Dimension window: Select an option with distance and bearing from the bottom of the list > OK
- - - - -
B) Calculation of distance & bearings and display in a table:
B.1 Create xy file with raw distance & bearings of the temporary file with the parcel:
Main menu > Utilities > Vector utilities > Export files > to Map Maker XY file > Export from DRA to Map Maker survey data – step 1window: Choose source DRA file > Select folder and file > Open > Next step > Export from DRA to Map Maker survey data – step 2 window: Compass traverse of bearing and distance pairs > Next step >
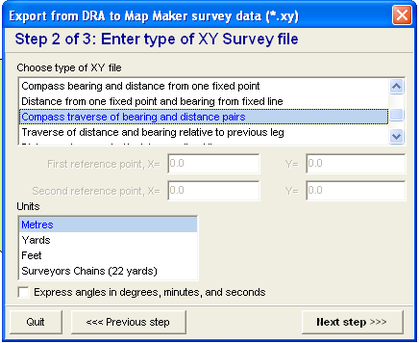
> Export from DRA to Map Maker survey data – step 3 window: Choose target file > Specify new file name (as xy file) > Save > Finish > Confirm save
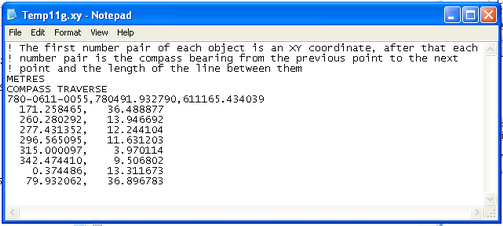
B.2 You can view the xy file in an editor:
In Windows Explorer: Locate and right-click on the xy file > Open with > Notepad
B.3 Import the xy file to Excel
In Excel: Open > Select file type: All files > Select folder and file > Open > Text Import Wizard – step 1 window: Delimited > Start import at row: 6 > Next >
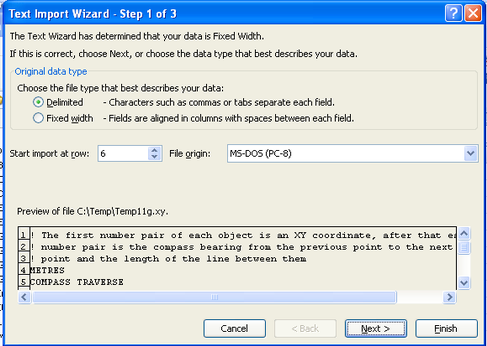
> Step 2 window: Select comma > Next > Finish
Row 1:Specific, as it contains the parcel number, and the x and y (Easting and Northing) of the starting point.
Row 2 and following: Column A contains the bearings (angle to north), column B the distances.
It is recommended to round the figures.

B.4 You can do editing in Excel or Word:
Starting point A 780492 / 611165
A - B 171.3° / 36.50 m
B - C 260.3° / 13.90 m
C - D 277.4° / 12.20 m
D - E 296.6° / 11.60 m
E - F 315.0° / 4.00 m
F - G 342.5° / 9.50 m
G - H 0.4° / 13.30 m
H - A 79.9° / 36.90 m
B.5 You can also import this table to Map Maker.