7.7.4 Geocoding database - LUPMISManual
Main menu:
7.7.4 Geocoding Database
Level of expertise required for this Chapter: Advanced; specifically for LUPMIS @ TCPD
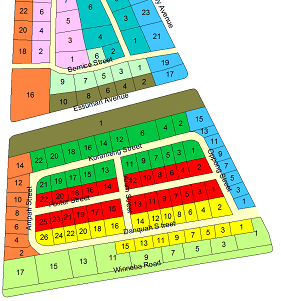
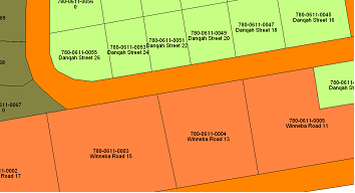
From the Local Plan with UPN numbers (see Chapter 7.7.1) and the street map (see Chapter 7.7.3), the geocoding database can be derived. A geocoding database contains names of streets and house numbers of each parcel. These numbers have to be user-friendly, easily to be recognized and identified in the field to be used by everybody (unlike the UPN numbers, which have a specific, technical function).
Geocoding database references do not have to be unique over Ghana, or to fit to an administrative system in all Land Sector agencies. Also, there is no need of a fully implemented structure.
Technically, they should be stored in (and retrieved from) the label field of the DRA file for each parcel in the Local Plan, similarly to the Permit Database link.
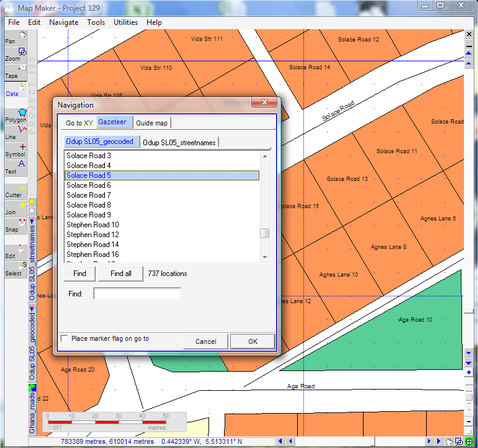
You can search for an address (street + house number) through the gazetteer: Main menu > Navigate > by Gazetteer > Navigation window: Gazetteer > Either: Select street name from list (1, see below), or: Enter first letters of street at Find and press Find > OK (2)
- - - - -
Prior to searching, the navigation gazetteer inside the Map Maker project has to be set up: Right-mouse > Project manager window: Navigation > Gazetteers > Add gazetteer > Select folder and DRA file with street names > Open > OK.
- - - -
In database terms, there is a one-to-one (i.e. clear and unique) relationship between UPN and geocoding database, which can be expressed in a reference table (see below).
You can retrieve this reference list through the 'UPN / housenumber Tool' of the 'Drawing Tools'. All data are stored in the DBF file of the Local Plan.
- - - - -
General process for entry of street names and house numbers: Create layer with street names --> Create DBF file --> Enter house number for each parcel --> Enter street name for each parcel.
1. Quality-control the Local Plan (Sector Layout). Check that all parcels have their (final) UPN: All ids must be unique, and have the UPN. You can perform this check also with the 'UPN Tools' of the 'Drawing Tools'.
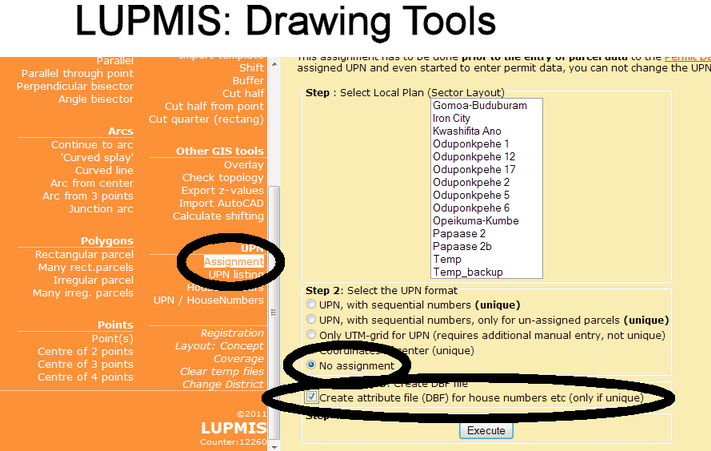
2. Create an attribute (DBF) file:
Easiest, to do this with the 'Assignment Tool' of the 'Drawing Tools':
Alternatively: Main menu > Utilities > Database utilities > Generate database from DRA > Select DRA file of Local Plan > Open > Generate database window: OK > Accept same filename, but as DBF file > Save >
> Clear Map Maker
> Modify this attribute (DBF) file by adding following columns:
Main menu > Utilities > Database utilities > Edit database > Select DBF file of previous step > Open > Edit columns > Add column > New column window: Field name:
STREET > Field type: Text string > Field width: 16 > OK,
and repeat this process for:
HOUSENO (text, width 16)
ADDRESS (text, width 32)
TCPD (text, width 16)
DATE1 (date)
Save this file as a DBF file under the filename of the Local Plan (e.g. Papaase.dbf).
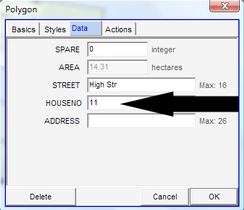
3. Assign even house numbers (2,4,6...) to the right side and odd numbers (1,3,5...) to the left side of the street. Start with the numbering from the centre or from where the streets branches off from a main road. Don’t worry about having gaps in the numbering sequence ('silent numbers', e.g. 22, 24, 30, 32): In live layer mode: With the Edit-tool (at the toolbar left), click on the parcel > Data > House: Enter the house number > OK. Don't forget to save.
To display the assigned numbers, the DBF file must be linked to the DRA file: Load the DRA file > right-mouse > Project manager > Data link > Choose database > Select DBF file > Open > Style (1, see below) > Labels (2) > Data value (3) > Tick Street and House (4) > OK

To display labels in live layer mode: Main menu > Edit > Live layer options > Live layer labels options > Data value > House > OK.
4. Assign street names to the parcels: Start with the main roads and assign numbers to all the parcels on the main road. Later, continue with the smaller streets depending on the direction of the road. It might be useful to load the street name layer (Chapter 7.7.3) with display labels: Load the layer into live layer > With the Select-tool (at toolbar left), select all parcels on both sides of the road (you can multiple-select by pressing the Ctrl button, when selecting) > Main menu > Edit > Show selection manager > Selection manager window: Data (1, see below) > Column STREET (2) > Column (3) >
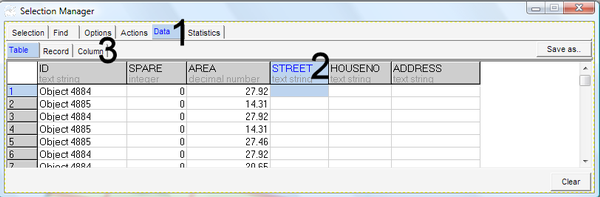
> Set all to: Enter street name (4) > Set all to (5) > Table (6) > Check, whether the street name has been assigned correctly > Clear.

Don't forget to save.
5. Create addresses in the DBF file: Main menu > Utilities > Database utilities > Edit database > Select DBF file > Open > Click on ADDRESS > Column > Calculate > Click on STREET > In the field, where STREET appears, type: + " " + > Click on HOUSE > Following text should appear: STREET + " " + HOUSE > Apply formula > Table > Check, that all addresses are correct > OK.
6. Copy the UPN, which is stored in the display label in the DRA file, to column UPN in the attribute file (see <a href="410_copy_styles_labels_attributes.html#Chapter4104">Chapter 4.10.4</a>).
7. Once you have both the UPN and the addresses (geocoding database) in the attribute file, you can display them together:
With the new file in the project manager: Data link > Database > Choose database > Select attribute file > Open > Style > Labels > Data value > Tick ADDRESS and UPN > OK
8. For the gazetteer, it is recommended to copy the ADDRESS from the attribute (DBF) file to the display label in the DRA file: In live layer mode: Right-mouse > Live layer action > Live layer actions window: IDs and labels > Amend labels and IDs > OK > Amend labels and IDs window: Set display label to external database value > OK > Select attribute file > Open > Choose link column window: ID > OK > Choose data column window: ADDRESS > OK. Don't forget to save.
- - - - -
Do not add or delete any parcels at this stage! This requires a thorough knowledge of Map Maker and will be explained separately.