8.2.2 UPN - LUPMISManual
Main menu:
8.2.2 UPN
Level of expertise required for this Chapter: Intermediate; specifically for LUPMIS @ TCPD
See separate Chapter 8.2.2a for full explanation of the UPN concept.
The entire process for Local Plans with 7 steps (4 mandatory + 3 optional) is documented at DrawingTools > UPN / Streetnames > General procedure:
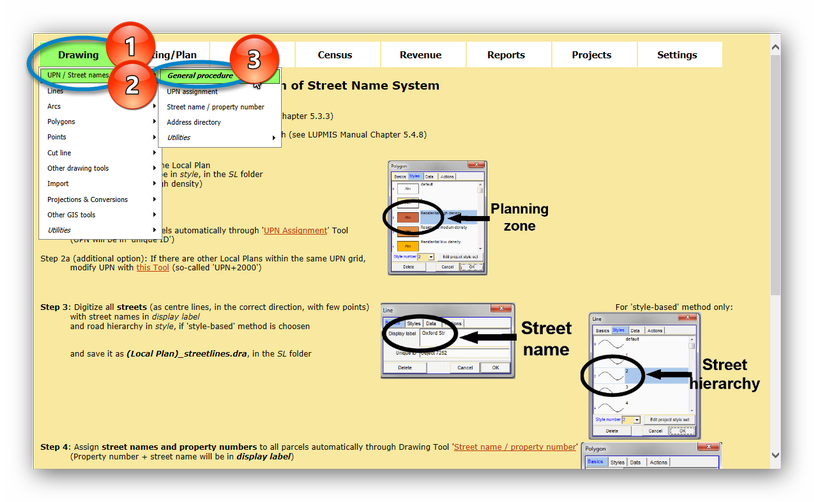
Step 1-2 for planning and UPN are explained on this page, street identification (step 3) and house numbers (step 4) etc on the following page (Chapter 8.2.3).
Step 1 is the design and digitization of the Local Plan, with all parcels and their planning zones (in 'style'), no entries into 'ids' or 'display label'. Be sure, that all units are properly 'snapped'. Never digitize any lines, points, streets into any plan (SDF, Structure Plan, Local Plan).
- - - - -
Following functions are available under Drawing Tools > UPN / Street names (plus Chapter 8.2.3):
UPN Assignment (step 2)
You can automatically assign UPN to each parcel of a Local Plan. UPN are 'Unique Parcel Numbers' established 2009 in Ghana to identify all parcels in Ghana with a unique number, used by all Land Sector Agencies and administration bodies. They consist of the UTM-km grid (bottom left corner) and a sequential number. For example, 781-0620-0004, which is parcel # 4 in the 781000-620000 UTM grid. More on UPN is explained in Chapters 8.2.2a and 7.7.1.
In the automatic process to assign UPN (strongly recommended) you select the completed Local Plan DRA file: Drawing Tools > UPN / Street names > UPN assignment > Select the Local Plan file (it has to be in the SL folder of the District) > UPN, with sequential numbers > Execute
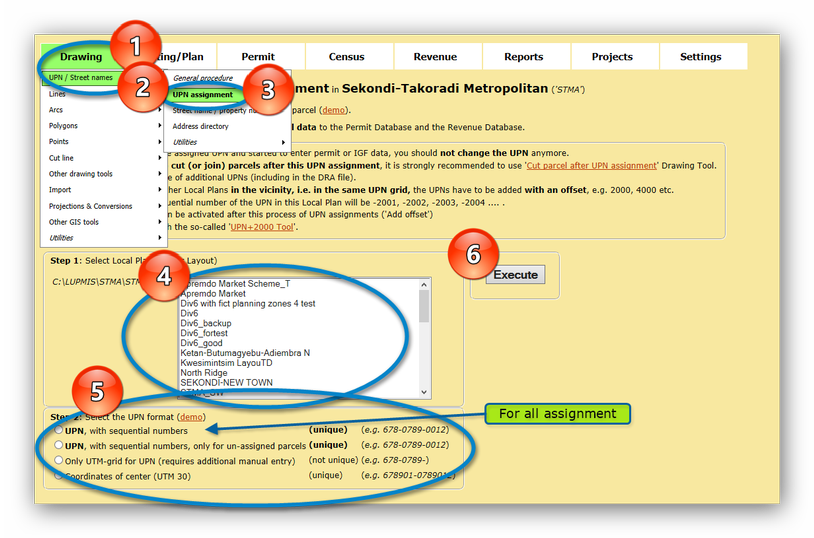
Be aware, that you can not re-assign UPN after you have done so earlier! This is to prevent that UPN are assigned, which are different to the previous assignment. (If there are UPN already assigned in 'display label', this process is blocked).
If you have added parcels to the plan, you can assign additional UPN with the option 'UPN, with sequential numbers, only for un-assigned parcels'.
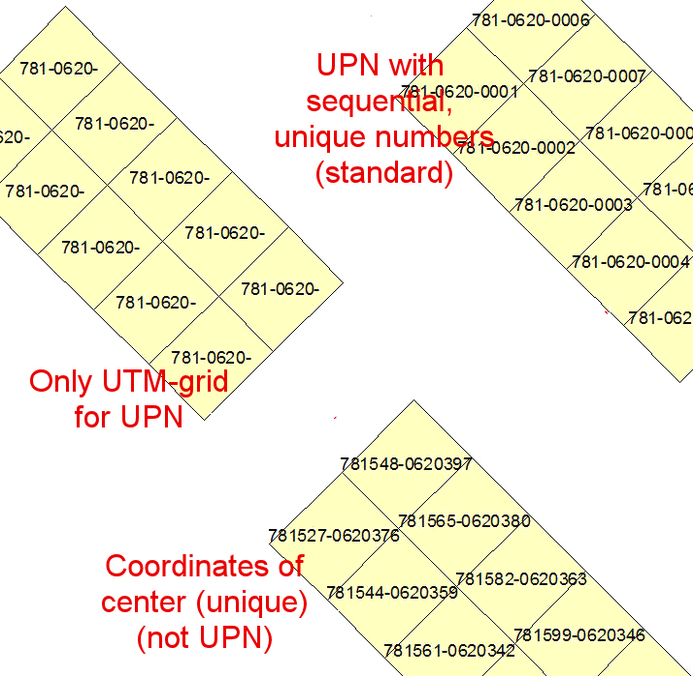
There are different options for the output format. In very most cases, it is advised to select the UPN with sequential unique numbers, to create a full UPN system.
Very important:
Once you have assigned UPN and started to enter permit or revenue data, you can not change the UPN anymore.
If you want to cut (or join) parcels after this UPN assignment, it is strongly recommended to use the 'Cut parcel after UPN' Drawing Tool (see below). This takes care of modified UPNs (including in the DRA file).
- If there are other Local Plans in the vicinity, i.e. in the same UPN grid:
- If you are working on a computer (e.g. master computer), where all Local Plan files are installed in the SL folder, LUPMIS will check all already assigned UPN to prevent any false 'double-assignment' of UPN. You don't have to worry about anything.
- If you are working on a computer, which is not linked to the other Local Plans, the UPNs have to be added an offset, e.g. 2000. Thus, the sequential number of the UPN in this Local Plan will be -2001, -2002, -2003, -2004 .... This option can be activated after the process of the UPN assignment.

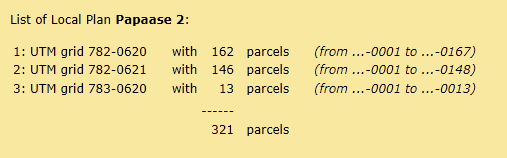
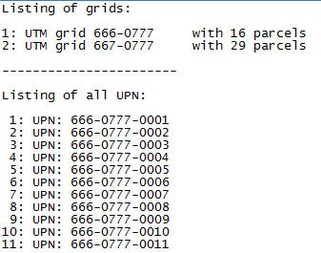
This is taken care of, if you can this Tool with all Sector Layouts in the SL folder. It will give a summary inventory after the UPN assignment:

Technical Note: If you really want to cancel all previous UPN assignments, you first have to cancel all UPN (in field 'id label') in Map Maker: Live layers > IDs and labels > Amend labels and IDs > OK > Set all display labels to > (empty) > OK
b) UPN List
The listing can be selected as a summary:
or for all individual UPN:
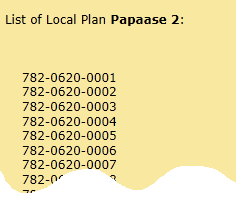
All these listing are also saved in text files (TXT) and in Excel files (CSV).
c) Cut Parcel after UPN (i.e. after UPN assignment)
After you have assigned UPNs to parcels, as explained above, you can not modify the Local Plan in Map Maker anymore, without special consideration of UPN. To facilitate cutting, joining and deleting parcels, use this Tool:
Drawing Tools > UPN / Street names > Utilities > Cut parcel after UPN > Select Local Plan file (it has to be in the SL folder of the District) > You are then requested to enter Map Maker and modify your plan: Cut, join, add parcels > Do not save! > Back to LUPMIS: Continue after editing in Map Maker